
Remove the seed pods from the plant and place them in a bag or container. Outside, don’t try to collect butterfly weed seeds.
Otherwise, you’ll be chasing them down the street every time the wind blows. Bring the seed pods inside once you’ve gathered them.
Where are the seeds in butterfly weed?
Butterfly Weed is a North American herbaceous perennial. It blooms for up to two months in the summer, with a typical blooming period of June to August.
This flower, which grows naturally in prairies and grasslands, is a vital plant for wildlife.
The major pollinators are bees, but it also serves as a home for a variety of butterflies.
Monarch Butterflies lay their eggs on this species of the Asclepias genus (milkweed).
Butterfly Weed Lifespan
Butterfly Weed is a long-lived perennial that thrives in a variety of soil conditions. Butterfly Milkweed bloomed for the first time this year in good soil. This, however, is not normal.
Butterfly Weed will blossom in its second year after being grown from seed.
Butterfly Weed should reach full size in the third or fourth year.
Butterfly Weed Growth Cycle
Butterfly Weed has a perennial life cycle. It will bloom in late Spring, much later than the majority of other plants. It will quickly grow to a height of 1-2 and bloom for about a month in early summer. Seed pods will appear in late summer or early autumn. The pods will ripen, open, and disseminate their seed before dying back to the ground.
Butterfly Weed Stalk
Stalks will grow to be 12-30 tall, with branching in the upper half where flowering takes place. When mature, many stems will emerge from a central root crown. The stem has a dark-purple tint to it and is covered in fine hairs.
Butterfly Weed Leaf Identification
On the stalk, the Butterfly Weed leaves are alternating and measure about 3 long by 1/2 wide with smooth margins. Veins run through most leaves, with the central vein being the most conspicuous. It’s very typical for your Butterfly Weed leaves to curl upward lengthwise.
Butterfly Weed leaves are stunning on their own. They’re dark green in the middle and slightly yellow on the edges. The upper surface is usually smooth and hairless, with a lustrous or waxy appearance.
The leaves’ undersides are a lighter shade of green, creating a pretty beautiful color shift.
Butterfly Weed leaves turning yellow
In most cases, the leaves are dark green on top and light green underneath. The margins are frequently golden in color. This has happened to me before, and I’ve found it to be perfectly normal. Butterfly Weed leaves (especially lower leaves) become yellow as the season progresses.
It could imply a few things if you notice the full leaf turning yellow before Autumn.
A nutritional deficit or an excessive amount of water. Alternatively, many native plants’ lower leaves become yellow and fall off when they lose sunlight.
If you’re concerned, top-dressing the plant with compost is the safest option.
Any nutritional deficits that the plant may be facing can be remedied by applying a 1-2 thick ring of compost around it.
If that doesn’t get rid of the yellow leaves, think about
Butterfly Weed Flower
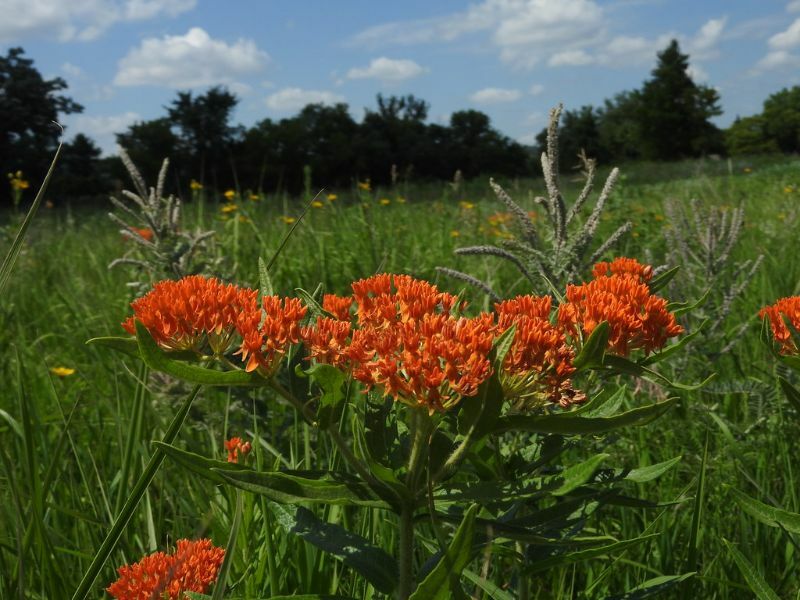
Butterfly Weed blooms are made up of clusters (umbels) of 10-30 individual orange flowers, each measuring 1-3 inches in diameter. They resemble milkweed flowers, with five petals, sepals, and hoods with horns.
Butterfly Weed Blooming Season
Butterfly Weed blooms can last up to eight weeks, beginning in June and ending in August. However, in late August/September, you may be treated to extra blossoming.
Butterfly Weed seed pods
Butterfly Weed pods will open in early autumn, and the plant will go to seed. Butterfly Weed produces pods that are 2-4 inches long and 1/2 inch broad after the blossoms have faded. The seeds are contained in these pods, which begin maturing in late summer to early fall.
When fully ripe, these pods will open and disperse seeds carried by the wind on a feather.
Seeds have the ability to spread far and wide, colonizing disturbed, bare terrain.
Should I remove seed pods from butterfly weed?
The dead blooms are removed, which hinders seed production and stimulates the butterfly weed to grow additional flowers. If you don’t want the butterfly weed to self-seed or just want to improve the aesthetic of your garden, prune off the seed pods in late fall or early winter.
How do you grow Asclepias tuberosa from seed?
Sun-loving Asclepias (Milkweed) plants are important perennials for monarch butterflies because they provide food for larvae and nectar for adult monarchs. They bloom from mid-summer to early-fall and are resistant to rabbits and deer because to their milky sap.
For plant care, Asclepias tuberosa with orange (occasionally yellow) blooms and all other species with pink (sometimes white) flowers can be split into two groups.
The seeds of milkweed (Asclepias) germinate best in warm soil. To germinate, the seeds require a chilly, inactive phase called as stratification.
They can be successfully sown outside in frost-free locations in the fall for spring germination. All species (A. tuberosa, A. syriaca, A. sullivantii, A. incarnata) will germinate relatively well when sown into warm earth after being stratified in mid to late spring (chilled).
Dry stratification is the process of putting dry seed in the refrigerator for 30 days or more. A more effective technique is to moist stratify them in the refrigerator for 30 days by mixing seed with moist (not soggy) sand in a zip-lock plastic bag. The seed’s inherent chemical germination inhibitors have disappeared after 30 days of cool wet storage, and it is ready to sprout.
- Orange Butterfly Weed (Asclepias tuberosa) – This perennial, especially when cultivated in containers, stays dormant until later in the spring than many other plants. Planting dormant plants is OK; do not repot them for planting later in the season.
- Soils that are sandy or gravelly are required (except the Clay form which does well in heavier soils including dry clay.)
- After their second growing season, they just need to be watered deeply but infrequently. Plant in direct sunlight.
- It only takes a few handfuls of compost and Yum Yum Mix to fill the planting hole. Planting in a rich, substantially modified soil is not a good idea.
- When planting dormant plants, water thoroughly after planting and then wait until the plant begins to develop actively, at which point a deep soaking once a week or so is sufficient. Young transplants should not be overwatered.
- Asclepias has a long, carrot-like tap root that should not be separated and should be left alone after planting.
- These are moist-loving perennials that thrive in moist to moderately moist soil.
- Asclepias syriaca and A. speciosa will expand to form large patches of plants, thus they should be planted in areas where they won’t force out less vigorous species. It’s not a good idea to use it in the most prominent areas in your perennial beds.
- Swamp Milkweed (Asclepias incarnata) is a more refined grower that is good in perennial beds.
Milkweeds don’t always develop much in their first year in the ground, so be patient. They’re building their root and crown systems. The plants will begin to grow larger and more vigorous by the second growing season. Asclepias species are unusual perennials that don’t behave like most other perennials. As a result, be patient and accept their peculiarities.
- Use Yum Yum Mix and Planters II to fertilize Asclepias only once in the fall. Additional fertilizer is not required for naturalized plantings.
- Leave the stems intact over the winter to enable re-seeding and provide winter interest with their attractive seed pods. Remove old stems just above ground level in mid-spring.
- Because all Asclepias species emerge late in the spring, don’t be alarmed if other perennials sprout first and they stay dormant.
Does butterfly weed bloom the first year?
Milkweed, also known as asclepias, is native to North America, and one of them, Asclepias tuberosa, has been named Perennial Plant of the Year by the Perennial Plant Association this year. This plant, sometimes known as butterfly weed or butterfly milkweed, has bright orange flowers that attract a variety of butterflies and bees with nectar and pollen. Butterfly weed’s leaf isn’t a favorite meal of monarch caterpillars, but it can help them survive. This drought-tolerant plant prefers a dry, sunny environment and is hardy in Zones 3 to 9.
Upright stems with clusters of bright orange flowers contrast attractively with the shiny green leaves of butterfly weed. Unlike other members of the genus, the stem sap is not milky. This milkweed is not invasive since it does not spread by runners like common milkweed (Asclepias syriaca). Although deer are not attracted to butterfly weed, aphids can be an issue in gardens and greenhouses.
This plant is expected to be in great demand in the next years. Butterfly weed blooms readily the first year after seeding, but there are a few crucial elements to remember if you want to grow it professionally.
This species displays some of the most extreme photoperiod reactions we’ve ever seen. It’s an obligatory long-day plant, which means it has to flower during long days. When grown at an average of 68° F, plants develop quickly under photoperiods of 14 hours or more, and begin flowering about eight to nine weeks after transplant. Plants that are exposed to photoperiods of 12 hours or less, on the other hand, die dormant after a few days (Figure 1, pictured above). Leaves droop, shoot growth appears to stop, and existing flower buds may suffocate (Figure 2). Unfortunately, simply reverting to longer days will not return the plants to active growth. A nine-week or longer cold treatment is required to break this dormancy; in our testing, all dormant plants treated to 41° F for 15 weeks bloomed.
It is critical to provide long days to plants in order to keep them actively growing. We propose at least 16 hours of daylight or four hours of night disruption illumination. A minimum intensity of 2 molm2s1 should be delivered by photoperiodic illumination. Use incandescent lights or LED bulbs intended to control blooming that emit both red and far-red radiation. Maintain these extended photoperiods for plants until natural daylengths reach at least 14 hours.
Butterfly weed has a huge tap root, making transplanting or dividing established plants difficult. It’s critical to utilize a well-drained medium in container production, so consider adding more perlite to a standard peat+perlite mix. During production and cold treatments, be careful not to over-water. The taproot attracts fungus gnat larvae, so keep an eye on the roots if your plants aren’t doing well.
Butterfly weed can grow up to 3 feet tall in the wild, but in container production, our plants were only 12 to 18 inches tall when they first bloomed. Sprays of daminozide (e.g., B-Nine, Dazide), paclobutrazol (e.g., Piccolo, Bonzi), and uniconazole (e.g., Piccolo, Bonzi) are apparently helpful for height management (e.g., Sumagic, Concise). To help fill out containers, use many plugs per pot or squeeze seedlings soon after transplant.
How do you harvest milkweed pods?
When the pods get brown, dry, and mature, pick them. The dark dried pod at the upper left is just starting to split open, making it ideal for seed harvesting. It’s more difficult to extract the floss from the seed once it fluffs out like the one in the lower left. Allow this pod to fall to the ground and distribute seed in the wind.
Should I cut back butterfly weed?
If you want to tidy up your butterfly weeds and encourage new development, cut them back by 1/3 to 1/2 in early spring before new growth begins. You might also wait until after the spring Monarch butterfly migration has gone before pruning.
Should I cut off lily seed pods?
Daylilies are a plant that both new and experienced gardeners will enjoy. They require little maintenance and thrive in practically any sunny site, from rich, moist soils to sandy, well-drained soils. Many cultivars are hardy to Zone 3 and require very little supplementary irrigation or fertilizer to thrive. Daylilies also come in a broad range of hues, including white, pink, red, purple, yellow, and orange, as well as every imaginable combination of these colors. Perhaps best of all, bug and disease concerns are virtually unheard of. When deer chew on early spring leaves and consume sensitive flower buds, they can be a nuisance.
Daylilies bloom from May to late September, depending on the cultivar. It’s feasible to have flowers for almost the whole growing season by combining a variety of daylilies with varying bloom periods. Daylilies’ flowers only survive one day, despite the fact that healthy plants can produce blooms for several weeks.
It’s partly an aesthetic concern whether or not daylilies should be deadheaded. Daylily blossoms that have been discarded are unpleasant. They swiftly turn to mush once they fade, occasionally drying on immature buds and preventing them from fully opening. Seed pods emerge after flowers are fertilized successfully. Seed generation consumes a significant amount of energy in most flowering plants, including daylilies. Seed production depletes root and shoot development, as well as future flowering potential. Seed pods should be removed for plant health reasons so that daylilies produce more flowers the next season.
Deadheading daylilies isn’t difficult, but it does take some time. Don’t feel obligated to deadhead your daylilies on a daily basis. Plants should be deadheaded at least a few times during their bloom phase to prevent them from focusing their energy on generating mature seed. All you have to do when the plants are in full bloom is snap off the spent flower heads and seed pods with your fingers. Flower stalks can be removed to the root using hand pruners once there are no more blooms.
Should you cut off seed pods?
Propagation information for Tecoma stans (Yellow bells) can be found on our webpage:
To keep seeds during the winter, air dry them at room temperature. For rapid germination, sow shortly after harvest in loose, moist-but-not-soggy, fine soil.
If it dies back in the winter, cut it back to the ground. To enhance flowering and bushiness, prune and pinch wasted flowers and pods.”
If you want to start your plant from seed, you should wait until late summer to clip off the pods once they are no longer green. You can clip the pods off whenever you want if you don’t want to propagate from seed. After the spring blossoming, we usually recommend clipping dead wood; otherwise, undertake mild pruning as needed.
Although Yellow Bells is a desert plant, it is not native to California, as you can see from this USDA Plant Profile, although Riverside County does fit the conditions for a desert plant.
What can you do with seed pods?
Many people consider collecting these to be their final tribute to the bloom. The flowering plant has a straightforward life cycle:
You only need to go to the seed pods between maturation and release to ensure that you have viable, mature seeds that are all in one area.
How To Collect Seeds From Seed Pods
You’ll need a few basic tools to get started. You’ll need some sharp scissors (or shears if you’re working with thick-stemmed plants), a small pocket knife (a pen-knife would suffice), some paper, burlap, or cloth bags (about the size of a lunch bag), a fine-tipped Sharpie, and a tool belt, box, or gym bag to carry everything in.
The goal is to gather seed pods and place them in the bags.
Individual pods from one plant can be placed in a bag (if you want to separate by plant) or each bag can be used for one species.
The marker will be used to label the bags so you can tell where the seeds originated from and what they are.
You can identify them ahead of time or in the field, whichever you want.
Collecting is a straightforward procedure.
The pod will be inside the bloom or slightly underneath it.
Some plants are “males,” meaning they do not produce a pod, while others are self-pollinating, meaning they produce both male and female flowers. Female flowers are usually larger than male blossoms in order to contain the seed pod. Simply cut the stem below the pod, brush the flower parts away (they should be dried and brittle), and insert the pod in the bag. The amount of seeds in each pod varies by species, so identify yours or break one pod open to check how many are inside to estimate how many you should collect. Rather of getting too few, always obtain too many.
Once you get the pods, you can cut them apart and remove the seeds in a safe spot (indoors, away from breezes and insects).
Place them on a cloth or piece of paper and spread them out.
Most of them should only need to be packaged and saved for the next year.
If you want to go through and separate away any that appear to be too small or off-color, you can do it now, but experience tells that this is easier to do in the spring. Seeds should be stored in paper bags in a cool, dry location.
Seed Saving Tips
Before you harvest the seeds, make sure they’re ripe. Pick a pod, take it out, and open it up. They aren’t ripe if the seeds aren’t the proper color or size (compared to store-bought or from memory). Because many flowers wilt at the time the seeds are fertilized, the seeds may not be ready for another month or more. Ripening times vary depending on the species.
How do you remove seeds from milkweed pods?
I squeeze the pod until the suture pops open, then hold the pod’s narrow end. Then I pull gently until the seed follicle emerges from the pod. Then, going WITH the grain of the seeds, I rake my finger nail along the seed follicle. They should just pop out!