
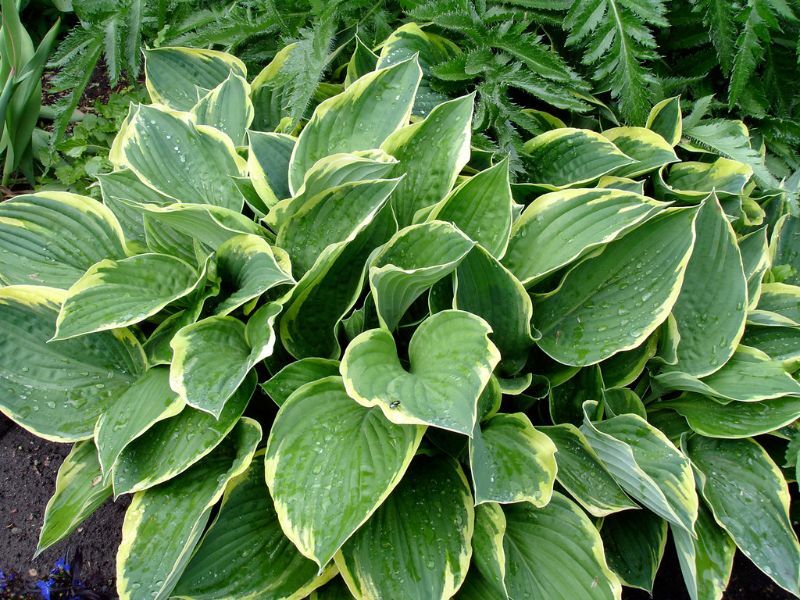
Hosta leaves curl as a result of underwatering, too much sun, poorly draining soil, and a lack of nutrients. To restore the hosta to its former glory, keep the soil moist, replant them in a more shady location, and into free-draining, pH-balanced soil.
Insecticides or neem oil can be used to kill pest insects. The way the leaves curl will give you a clear indication of what is most likely causing the problem. Curling up, for example, suggests that they are exposed to too much sun or wind.
I’ll go through the different types of curling leaves and what they mean, as well as what you should do if your hosta leaves curl for any of the reasons.
What happens if you overwater hostas?
Water is a favorite of Hostas. They get about 60 inches of rain per year in their natural habitat. Only Alabama, Arkansas, and Louisiana have that much precipitation on an annual basis. (The average annual rainfall in Delaware is less than 41 inches.) Because of the high rate of transpiration of hosta leaves, it is critical that we feed the extra water required for growth. During the whole growing season, a minimum of 1 inch of rain or supplementary water must be provided per week. Extra water above this requirement can assist in achieving maximal growth. The goal is to keep the soil at a steady moisture level. (Avoid alternating wet and dry extremes.) Watering in the morning is ideal since the hostas have all day to absorb the liquid. A lack of water can cause leaves to droop or even burn at the leaf tips. Hostas can go “drought dormant” and stop growing if there is a severe or prolonged absence of water. Although plenty of water will normally encourage these plants to re-grow, be sure that this re-growth does not occur too late for the hostas to go dormant before winter arrives.
The sort of fertilizer you use (chemical or organic, granular or liquid) is entirely up to you. Whatever type of Hosta you have, it will respond to fertilization. Many growers use a balanced N-P-K fertilizer like 10-10-10. Trace elements including chelated iron, magnesium, and calcium may also be useful. A soil test can also help you figure out if your soil has any inadequacies. Milorganite (6-2-0) treated sewage waste, soybean meal (8 percent N), animal dung, and even compost are all viable options. Milorganite has a strong odor and may include heavy metals; “fresh” animal manure has the ability to “burn” plants. Also, avoid fertilizing too late in the season. An early winter freeze can harm or even kill hosta plants that are actively growing.
Mulches aid in the retention of water in the soil by minimizing evaporative water loss, as well as reducing the quantity of weeds, water splashing, and providing a beautiful backdrop. Mulches include pine straw, cocoa mulch, pine bark nuggets, shredded hardwood mulch, shredded leaves, and even colorful stones. Mulches should be no more than 2-3 inches thick and kept at least 2-3 inches away from the petioles of hostas. There are a few disadvantages to using mulch. Slug and vole populations may increase in tandem with the likely increase in disease caused by the usage of organic mulches.
During the growth season, Hosta can be planted at any time. If you’re planting in hotter weather or in a brighter spot, you’ll need to give it plenty of water. Although hostas can be divided at any point during the growing season, the optimal times are before the plant starts to grow significantly in the spring and 4-6 weeks before the season ends.
This is a matter of personal preference. Some argue that the energy expended by the plant in creating seeds will be unavailable for future growth. If you remove the flower scapes before they open, you’ll miss out on the enormous, colorful, or fragrant flowers that some hostas have to offer. Even if the scapes are removed, some hostas, such as ‘Lemon Lime,’ may bloom again.
- Hostas prefer the shade, but some types can tolerate the sun, especially in temperate climes. The more sun your planting site receives, the more compact the plant will become, but it will also produce more flowers. The plant will grow larger and have more luxuriant foliage under more shade.
- Hostas require a consistently moist, humus-rich soil. Organic matter should be added to your planting beds.
- Blooming Season: Depending on the cultivar and your lighting conditions, hostas bloom at different times.
- After working with organic matter, make a hole twice the diameter of the plant ball. Remove any roots that are enclosing the root ball and transplant at the same depth as before. Fill up the gaps with the enriched dirt. To settle the soil, give it plenty of water. In the spring and throughout the season, fertilize with a time-release fertilizer. To promote water retention, apply a thin layer of bark mulch on top, but keep in mind that this may attract slugs. Although division isn’t strictly necessary, it can be done in the spring or fall.
- Combine hosta with astilbes, Alchemillas mollis, hardy Geraniums, and other shade perennials like Acontium, Pulmonaria, and Tricyrtis in a Hosta Pals arrangement.
How do you treat leaf curls naturally?
Spraying sulfur or copper after leaf drop in the fall and again in the spring is the most popular treatment for leaf curl.
It’s common belief that once the leaves are contaminated, there’s little you can do to save them during the season. And that you’ll have to wait until the fall to do so. However, spraying the tree with these items would cause the remaining leaves to burn.
That’s not quite what we’re searching for, is it? You don’t want to lose an entire crop this year, do you?
Who wants to spend the entire season watching the tree disease? It was not acceptable to have icky fungus spores slowly kill our fruit trees.
What are the symptoms of leaf curl?
Leaf curl is a disease that affects peach, nectarine, and related ornamental plants in the spring. Though the disease isn’t a problem every spring, it can be particularly bad after a warm winter and a cool, damp spring. The leaf curl fungus kills peach trees by forcing them to remove their leaves prematurely. The trees become weaker as a result, leaving them more prone to various illnesses and winter damage. The following season, weaker trees will produce fewer fruits. When blooms and immature fruit get sick and drop, yields may be further diminished.
Symptoms
Leaf curl symptoms emerge in the spring. The leaves are significantly deformed (thickened and puckered) and have a crimson or purple cast as they develop. The leaves turn powdery gray in hue when spores grow on the leaf surface. The leaves become yellow or brown and fall shortly after that.
This disease does not spread from sick leaves in the spring to new leaves generated later in the growth season. During that growth season, no further symptoms will occur once the diseased leaves have fallen. Swollen and stunted twigs with a faint golden hue are signs of disease. At the apex of their leaves, they frequently develop curled leaves.
Flowers and fruit can get infected, however this is a rare occurrence. They die soon after becoming afflicted. Shiny, crimson, elevated, warty patches characterize diseased fruit.
Causal Organism
Taphrina deformans is the fungus that causes peach leaf curl. The fungus survives the winter in the form of spores (conidia) on the bark and buds of trees and shrubs. Early in the growth season, infection occurs. The conidia infect new leaves as they develop from the buds during the chilly, rainy spring season. Host plant tissues are only vulnerable for a short time. The tissues become more resistant as they age. On the upper surface of the infected leaves, the fungus forms a different type of spore (ascospore). Ascospores produce more conidia via budding under moist conditions. Rain and wind carry the conidia to different areas of the tree, where they will overwinter until the next spring.
Leaf curl infection might be limited by the environment. This helps to explain why the sickness doesn’t strike every year. When the temperature is cool and rainy, leaf curl is exacerbated. Low temperatures are supposed to slow the maturity of leaf tissue, allowing infection to take longer. At temperatures between 50 and 70 degrees F, the fungus may easily penetrate young peach leaves, but only weakly below 45 degrees F. Infection necessitates rain.
What does an overwatered hosta look like?
Hosta leaves can become yellow for a variety of reasons, and it’s critical that you figure out which one relates to your plant.
Hosta Leaves Turning Yellow from Scorch
When yellow hosta leaves suggest too much sun, it’s probably the easiest problem to fix. Hosta are shade-loving plants that thrive in partial or full shade. In fact, they’re a common sight in the shade garden. Yellow hosta leaves can be expected if grown in full sun. The leaves turn yellow and burn at the edges. Hosta scorch occurs when the leaves of a hosta plant become yellow as a result of too much sun.
If the plant is also cultivated in poor soil, the scorch will be significantly worse. The plant prefers moist soil that is rich in organic materials. The hosta leaves turn pale and burn when they are dried out in full light during a drought. You can provide temporary relief to the plant by watering thoroughly early in the day, but a better and more permanent option is to relocate the hosta to a shaded location with high organic matter soil.
Yellowing Leaves on Hosta Indicating Disease
When yellow hosta leaves signal disease, the treatment options become more limited. Petiole rot, caused by the fungus Sclerotium rolfsii var. delphinii, can produce yellowing leaves on hosta plants. Yellowing and browning of the lower leaf edges are the first signs of the disease. Your plant most likely has this disease if you notice brown, mushy decay with white fungal threads or fungal fruiting structures around the size of mustard seeds near the base of the petiole.
Do hostas like sun or shade?
A. Hostas are low-maintenance plants with a wide variety of types to pick from. Even though they are shade-tolerant, most of them will not survive in deep shadow. When given some sun, such as early sun with afternoon shade, many hostas become more strong and show their best colors. The sun is less bright in the morning than it is in the early afternoon. It will most likely be OK in the late afternoon sun.
How often should you water a hosta plant?
Small or medium plants will require a good soak once a week once they have established themselves. Hostas tolerate drought but need moist, well-drained soil. Increase the watering frequency to three times per week if the weather is warm. Large hostas should be watered twice a week in the summer and daily in the winter, especially if they get a lot of sun.
Growing Hostas in pots necessitates more frequent watering. Because pots drain faster than gardens, giving the plant the slow sip it requires can be difficult. Water the pot every three days during the summer months. If the soil still appears to be too dry, it may need to be watered on a daily basis.
Should I cut damaged hosta leaves?
Unfortunately, injured Hosta leaves need not be removed until after the autumn deadly frosts arrive, as unattractive as they are. The dead, unattractive foliage should then be removed and destroyed. The good news is that magnificent new Hosta leaves with no holes will emerge next spring!
Should I cut off Brown hosta leaves?
In the fall, Hostas naturally turn brown and die back. After the leaf margins begin to yellow or brown, cut back all of the foliage. Remove all of the foliage from the plant’s base and discard or compost it. Once the foliage turns dormant, Hostas don’t need to be watered. To insulate the roots in the winter, replenish the mulch layer to 2 inches, but avoid covering the plants’ crowns.
What is wrong with my hostas?
The most frequent foliar disease of hostas is anthracnose. The cores of the spots frequently disappear, and the leaves become ragged and shredded. Because the disease thrives in warm, damp environments, keeping adequate plant spacing is critical for protection.
When should I spray for leaf curl?
Despite the fact that your fruit trees may appear to be dormant over the winter, the microscopic world of fungi is planning ahead, strategically hiding in the cracks and crevices of your trees until the weather warms up. Peach Leaf Curl is the most common fungus, and it causes ugliness of the leaves, as well as the fruit, on peaches, nectarine, apricots, and even almonds. However, there are a variety of additional fungal issues that might arise, and winter spraying is an effective strategy to help limit the occurrence of fungal problems.
Peach Leaf Curl causes blistering and puckering on new growth on your trees, as well as pimples on fruit and premature fruit drop in severe situations. The fungus will multiply in the cool, moist conditions of early spring, and if the cycle is not halted, your trees will be plagued year after year.
Shot Hole, Freckle Spot, Rust, and Powdery Mildew are some of the other fungal infections that can be found dormant on stone fruit.
There are various things you can do in the garden to help prevent the spread of Peach Leaf Curl and other fungal diseases.
Maintain proper garden hygiene. Avoid throwing fallen leaves in your compost by picking them up from the ground. To enhance air circulation, remove any broken or rotten fruit and prune the tree to an open vase form.
Plant your tree in well-prepared soil in a location that receives lots of sunlight and has good air circulation. Maintain a consistent fertilization and watering routine.
During the winter, spray your trees with a low-impact fungicide. ‘Winter-washing’ kills spores and reduces the incidence of Peach Leaf Curl and other fungal issues.
Copper oxychloride or lime sulphur, sprayed every other year, is the finest spray to use. The first spray should be applied in late autumn, just before the tree goes dormant. In late winter or early spring, spray again as the buds enlarge or explode. Spraying for Peach Leaf Curl and other fungal diseases after the leaves have opened up is too late. Spraying may only be done safely and effectively near the conclusion of the next summer.
Be aware of the potential influence of’spray drift’ on adjacent flora, soil microorganisms, pets, and humans while spraying fruit trees. Spraying is usually done until the spray liquid has completely covered the tree surface and has run off onto the ground. It could be a good idea to set down spray sheets to cover non-targeted locations.
To prevent the difficulty of having to dispose of huge amounts of unwanted spray, only make up enough for the job at hand.
Spraying may not be completely effective, so keep an eye out this summer and remove any leaves that show signs of fungal illness as soon as they develop.